Checklist
| Preparation | Wash – Name – Explain | |
| Position patient appropriately for procedure | ||
| Gather equipment | ECG machine | |
| Electrode stickers | ||
| Hair removal (if required) | ||
| ECG machine set-up | Input patient details | |
| Paper speed 25mm/s | ||
| Voltage 10 mm/mV | ||
| Electrode & lead placement | V1 – 4th intercostal space, right sternal edge | |
| V2 – 4th intercostal space, left sternal edge | ||
| V3 – halfway between V2 and V4 | ||
| V4 – 5th intercostal space, mid-clavicular line | ||
| V5 – 5th intercostal space, anterior axillary line (halfway between V4 and V6) | ||
| V6 – 5th intercostal space, mid-axillary line | ||
| RA (red) – right arm | ||
| LA (yellow) – left arm | ||
| LL (green) – left leg | ||
| RL (black) – right leg | ||
| Performing ECG | Ask patient to lie still | |
| Review signal in all leads | ||
| Record ECG | ||
| Review print out quality | ||
| Finishing | Detach leads | |
| Remove stickers | ||
| Wipe down machine and leads | ||
| Wash hands | ||
| File ECG in patient notes |
Explanation
Preparation
Wash, name, explain:
- Wash your hands
- Introduce yourself by name and role
- Check the patient’s name and date of birth
- Explain the task and get consent
- You may wish to consider having a chaperone present
“Hello, I’m one of the doctors. I’ve been asked to perform an ECG, which is a tracing of the electrical activity in your heart. This involves attaching small stickers and wires to your chest and limbs. It will not be painful, and you can ask me to stop at any time. Would that be okay?”
Position the patient appropriately for the procedure. For an ECG, ensure that they are lying flat or semi–recumbent. Expose the patient’s chest, arms, and lower legs. If the patient is wearing a bra, ask them to remove it. If the patient has significant body hair, it may need to be removed to ensure good electrode contact with the skin.
Gather Equipment
Gather the following equipment:
- ECG machine
- Electrode stickers – you will need 10: six for the chest and four for the limbs
- Hair removal equipment (if required)
ECG Machine Set-up
Enter the patient details into the ECG machine.
Ensure that the machine is calibrated correctly. For a standard ECG, the paper speed should be set to 25mm/s, and the voltage should be set to 10 mm/mV. Adjust the settings on the machine you are using if they vary from these.
Electrode & Lead Placement
Attach the electrode stickers to the patient at the correct site for each ECG lead, and then attach the leads to the corresponding electrodes. Ensure the leads do not pull on the electrode stickers, as this may affect contact with the skin. Attach the limb leads to the distal forearms and lower legs.
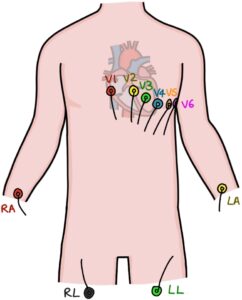
The chest leads are attached as follows:
- V1 – 4th intercostal space, right sternal edge
- V2 – 4th intercostal space, left sternal edge
- V3 – halfway between V2 and V4
- V4 – 5th intercostal space, mid-clavicular line
- V5 – 5th intercostal space, anterior axillary line (halfway between V4 and V6)
- V6 – 5th intercostal space, mid-axillary line
The limb leads are attached as follows:
- RA (red) – right arm
- LA (yellow) – left arm
- LL (green) – left leg
- RL (black) – right leg
Performing the ECG
Once all the electrode stickers and leads are attached, ask the patient to lie still and review the trace on the screen of the ECG machine. Ensure that there is a good signal in all leads with minimal interference or baseline wander.
When satisfied with the trace, press the button to record the ECG. Ensure the printout is of good quality.
Finishing
Detach the leads from the electrode stickers. Offer the patient the option to remove their own stickers, or remove them for them if they prefer. Clean the ECG machine and leads.
Ensure that the patient is feeling well. Wash your hands. File the ECG in the patient’s notes.
Last updated Mar 2025
Head to members.zerotofinals.com for practice OSCE stations, including an interactive checklist, specific cases and clinical findings.
![]()